There are lots of tips out there for packing efficiently, minimally, and organizationally. I’ve written about many of these, including packing strategies, clothing and toiletry ideas, and the best travel bags and accessories. I’m also a crafty soul and love a good do-it-yourself alternative. With a little creativity, you can customize to your needs, wants, and tastes and save some money into the bargain – win, win! Here are five of my favorite DIY hacks for packing on a budget, personalizing, and recycling.
1. DIY Toiletry Sheets
Toiletry sheets are a great way to save space and to avoid liquids in your carry-on bag. They are basically small pieces of water-soluble paper loaded with shampoo, soap, body wash, laundry detergent, shaving cream, etc. You can buy pre-made ones pretty inexpensively but what if you are particular about the products you like? Some people are sensitive to scent, prefer natural products, or require a specialized product such as moisturizing or frizz-controlling shampoo. (I love Dr. Bronner’s because it’s versatile, natural, and biodegradable.) It’s actually pretty easy to make your own toiletry sheets with your chosen product(s) – a great DIY packing hack!
What You Need:
- Water-Soluble Paper
- Your Favorite Liquid Toiletry Product (shampoo, body wash, etc.)
- Clothes Pins & Line or Clip Hanger
- Foam Brush/Paintbrush (helpful but not essential)
Instructions:
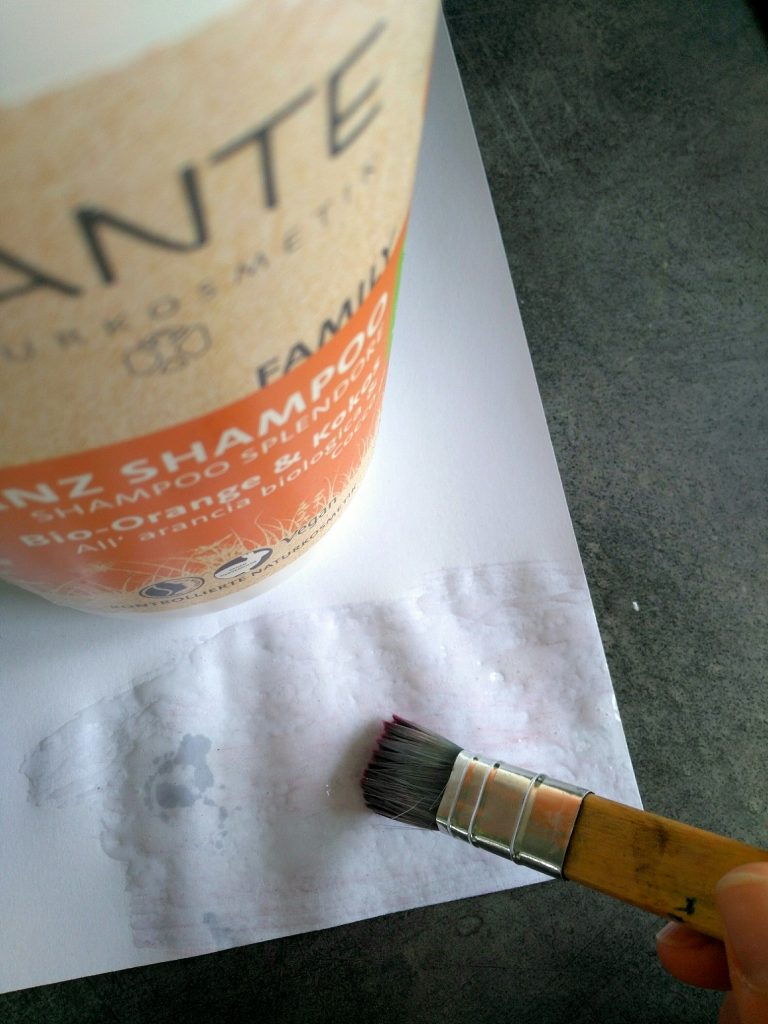
- Lay out a sheet of water-soluble paper on a clean work surface you don’t mind getting a bit messy.
- Drizzle a small amount of your chosen toiletry product onto the paper.
- Use a foam brush (or soft paintbrush or even your fingers, in a pinch) to spread the toiletry product in a thin, even layer across the paper leaving a dry 1-2cm strip along one end. Be careful not to over-saturate the paper so it does not tear.
- Clip the dry strip of the paper to the line or hanger and leave it hanging until dry.
- Repeat on the opposite side of the paper.
- Repeat all steps 2-3 times on each side to build up enough product, making sure to let the paper dry fully in between each application.
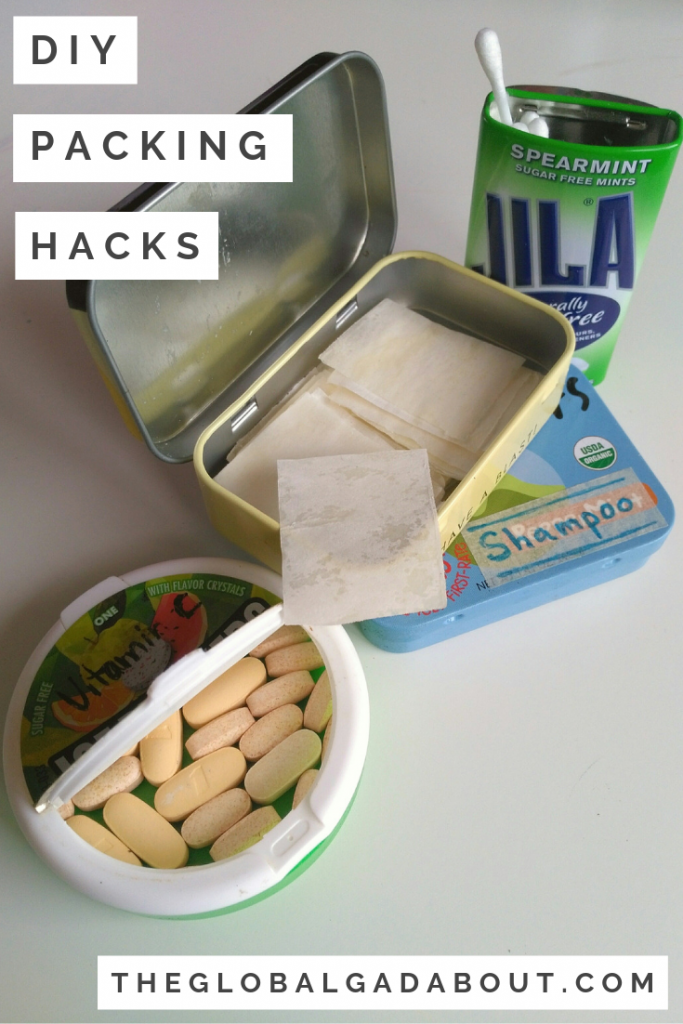
- Once fully dry with all coats applied, cut into pieces and store in a dry container (see #5 for a hack idea!).
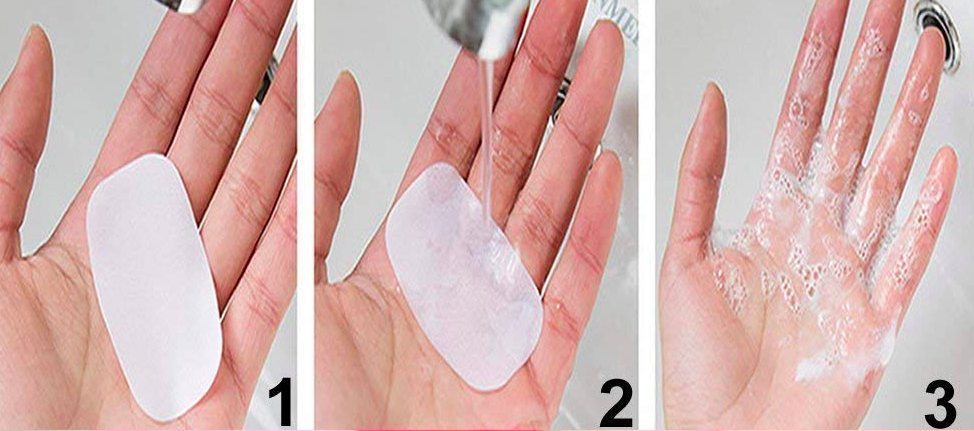
- To use, remove 1-2 toiletry sheets (depending on the size you cut and your personal needs), wet the sheet, rub in your hands to foam a bit then rub over hair, body, etc., according to purpose. The paper will dissolve, leaving the product for use. (FYI: there may be small, foamy remnants of the paper left that you can simply wash away.)
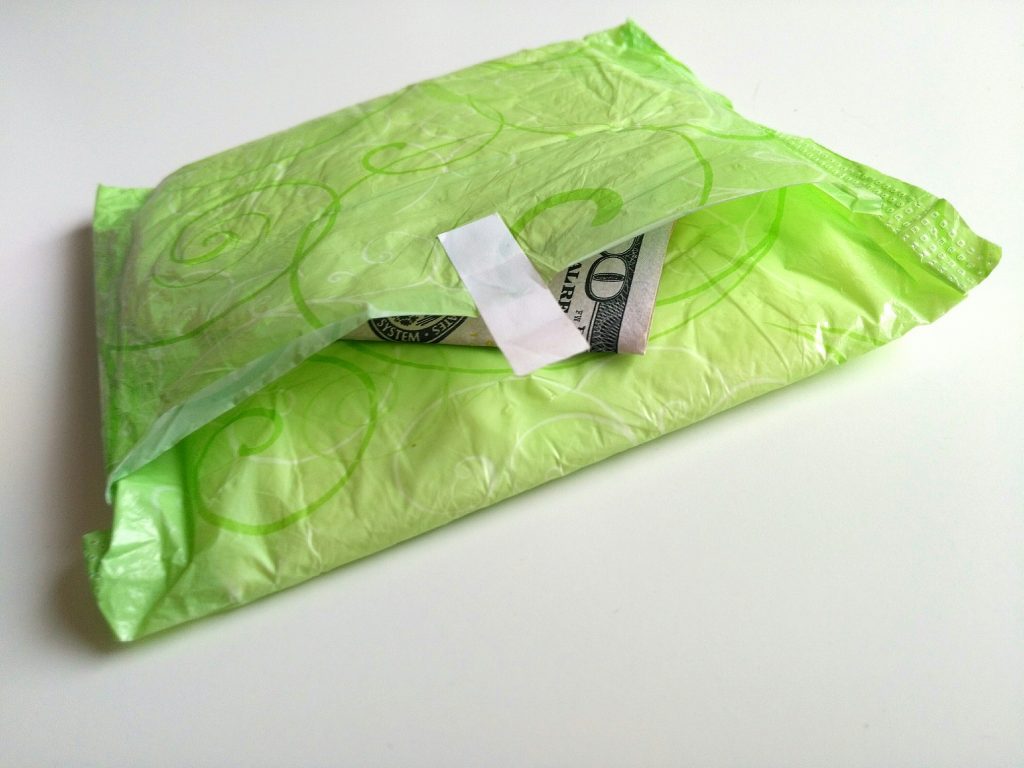
2. Money in Maxi Pad
When I travel, I always carry a couple of hundred dollars in cash, separate from my wallet, for emergencies. This can be very helpful if you find yourself running low on funds, in a situation where you can’t use a credit card, or in the worst case, if your wallet is lost or stolen. As an assurance against loss and theft, I like to keep my emergency cash fund in a different bag to my wallet (usually my main suitcase, versus my purse or daypack) and to conceal it somewhere it will most likely be overlooked by a thief. As a woman, my favorite such place is a maxi pad. It is very easy to slip paper money into a maxi pad without it being noticeable at all and personal hygiene products are not going to be top of a potential thief’s list. Just be sure you don’t give it away to a fellow lady in need!
What You Need:
- Maxi Pad
- Cash
Instructions:
- Lift the small sticker tab on the maxi pad, trying not to rip open the sizes of the plastic wrapper.
- Fold your cash so it will fit and slip it under the tab and in between the folds of the pad.
- Reseal the tab to secure the cash and make it look like it’s never been opened.
For gentlemen or non-pad-using ladies, try one of these other secret cash stashing spots: empty lip balm tube, between your phone and its case, under the liners of your shoes, rolled up in socks, rolled up in toothpaste tube (place folded cash near the end of a partially used tube, roll the end up over the cash squeezing the toothpaste forward, secure with a binder clip), or replacing a stick of gum in a traditional pack (fold your cash the size of a stick of gum, wrap it in the foil from a piece you’ve chewed, and replace it in the pack.).
3. Straws for Necklaces & Toiletries
Plastic straws are becoming a huge environmental problem and I recommend reusable plant-based, silicone, paper, or metal ones instead. All of these work well for one of my DIY straw hacks. For the other hack, you will need to use plastic straws, however, so I would advocate reusing ones you get already opened at a restaurant or with a takeaway drink rather than buying new ones.
Universally, you can string necklaces through straws to keep them from tangling in your luggage. Plastic straws can be turned into individual toiletry packs that are easy to use and small enough packages to take in your carry-on. You can create single-use portions of toothpaste, shampoo, body wash, lotion, sunscreen, etc to toss in your daypack or use one at a time from your toiletry kit.
Necklace-Organizer
What You Need:
- Necklace(s)
- Straw(s)
Instructions:
- Unclasp your necklace.
- Feed one end through the straw.
- Re-clasp.
- Repeat for all desired necklaces.

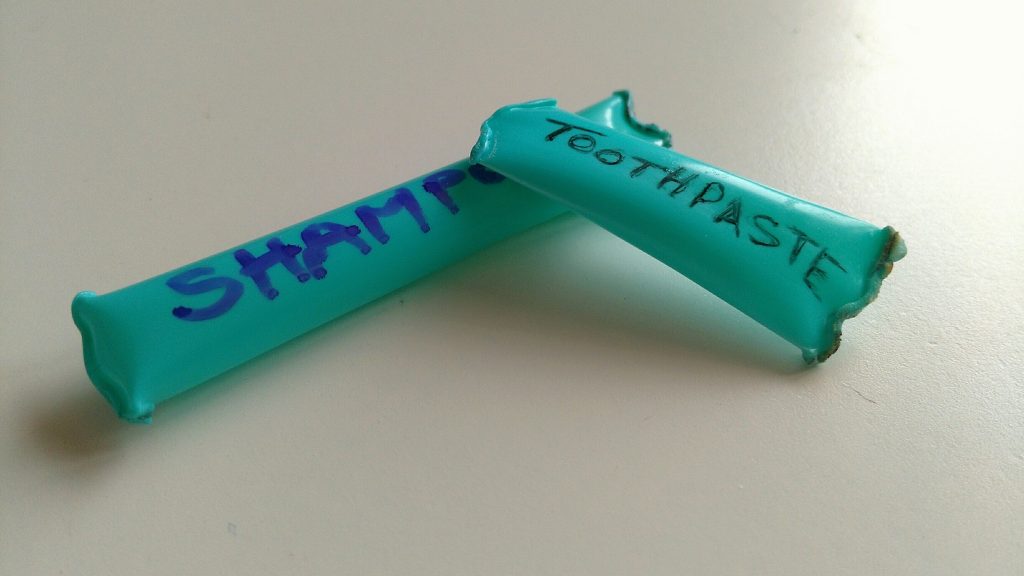
Toiletry Packets
What You Need:
- Toiletry Product(s)
- Plastic Straw(s)
- Scissors
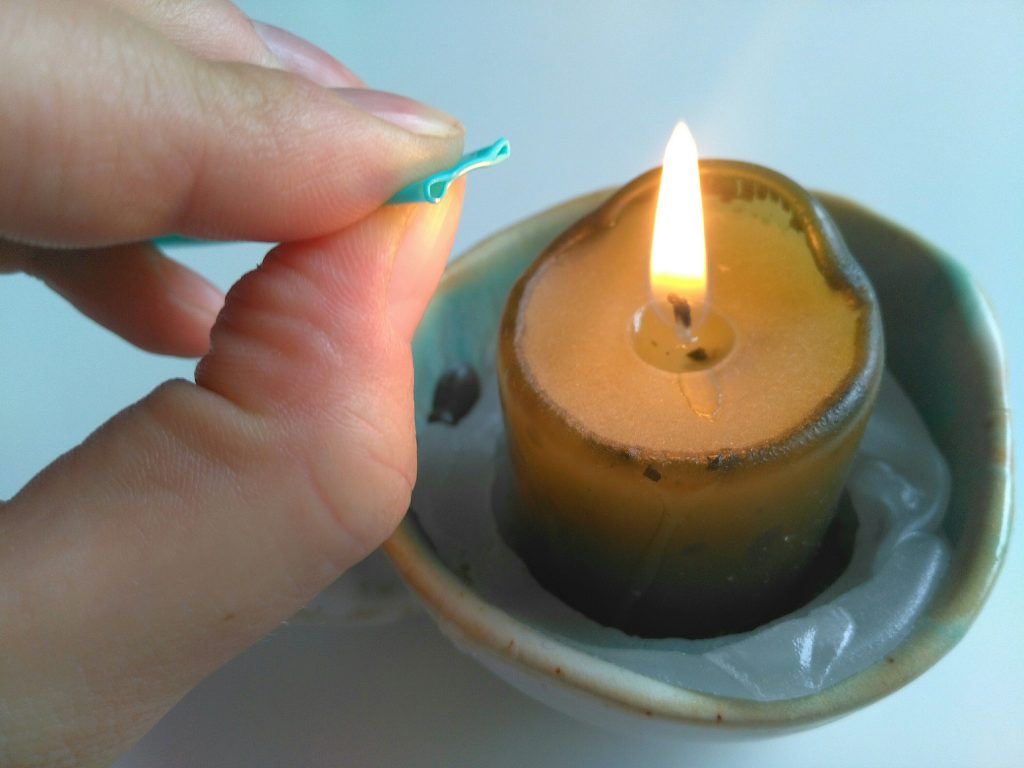
- Lighter/Matches/Candle
Instructions:
- Pinch the end of a straw so that it touches itself.
- Use a flame from a lighter, match, candle, etc. to melt the plastic and fuse the end of the straw closed.
- Determine how much of your chosen toiletry product constitutes a single use.
- Fill the straw with a single serving of your chosen toiletry product.
- Use the scissors to clip the open end of the straw slightly above the level of the product within.
- Pinch the open end together and seal with the flame.
- To use, cut one end open or pinch the ends of the seal hard with your fingers to break it and squeeze the product out.
- Reuse or recycle the empty straw 🙂
4. Foil RFID Block
RFID, or Radio Frequency Identification, is a widely used wireless technology that stores information and can transmit data via radio waves. It’s how security tags work in a clothing store or how you can track vehicles or livestock, for example. It is sometimes used for sensitive information relating to your identity or financials, such as in your passport or credit cards. This has led to concerns about identity theft, as anyone with an RFID scanner who gets close enough could, in theory, “skim” your information without your knowledge. While this is certainly possible, most experts do not consider it a huge concern as an RFID-related crime has never actually be prosecuted.
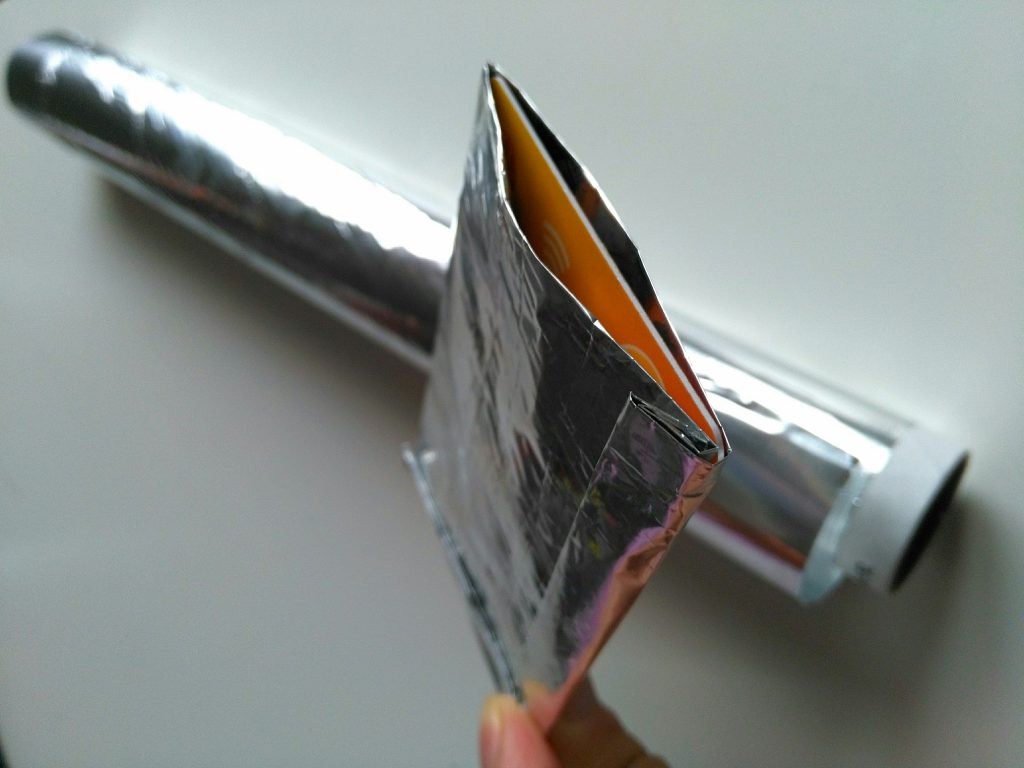
If you want to be safe anyway, or don’t want your information available even if it’s only being used for statistics, marketing, etc., you can shield your belongings to help avoid this. There are tons of RFID blocking products out there, from simple Tyvek sheaths to wallets, to entire bags. If you don’t want to shell out for a specially made items, you can easily create your own protection with a simple house-hold product: aluminum foil. Now, foil may not block RFID readers completely but it does impede them quite a bit, meaning they would have to be very close to, if not touching, the source to be able to read it. This is also true of a lot of specially made RFID blocking products.
What You Need:
- Aluminum Foil
- Tape/Glue (optional)
- Scissors (optional)
Instructions:
- Fold/cut the aluminum foil to create 2-3 layers in the shape of the object you are trying to protect.
- Fold, tape, and/or glue the foil into a protective packet with one open end to access the contents.
- Alternatively, line your wallet/purse/bag with several layers of aluminum foil and keep your sensitive items within this foil lining.
5. Empty Mint Containers
I love this hack because it is handy, money-saving, and involves “up-cycling” used items rather than throwing them out. If you’re a mint-lover or gum-chewer, you can reuse the plastic or metal containers they come in for a variety of travel purposes. They’re great for storing and organizing pills/vitamins, headphones, DIY toiletry sheets (see #1 above!), jewelry, Q-tips, bobby pins, you name it!
You Will Need:
- Empty Mint Container(s)
- Permanent Markers/Washi Tape/Paper/Other Decorating & Labeling Craft Items (optional)
Instructions:
- Wash and dry the empty mint container(s).
- Decorate as desired with permanent markers, paper, stickers, washi tape, etc. and/or label the contents as simply or elaborately as you want.
- Fill with desired contents.

*This post includes one or more affiliate links. I earn a small commission (at no extra cost to you!) if you purchase a product or service through one of these links. Find out more here.*
Related Posts:
Want more from The Global Gadabout? Sign up for the newsletter and get access to exclusive printable freebies!
Pin this post for later!